Here is a step-by-step process for building my first website:
Step 1: Defining My Goals
Before I started building my website, I thought about what I actually wanted to get out of it. I wanted it to show off my work, share a bit about my experience, and make it easy for people whether that’s future employers or clients to get in touch with me. Once I had those goals in mind, it really helped shape how I structured and designed everything. It wasn’t just about making something look nice, it had to have purpose too.
Step 2: Selecting the Right Platform
I went with WordPress because that’s what we were going to use in class. It’s not too hard to use, super customizable, and has tons of different themes and plugins to play around with. As someone who’s not exactly a coding expert, WordPress felt like the perfect mix of user-friendly and professional. Plus, I liked knowing that if I ever wanted to get more creative or advanced with my site in the future, WordPress would let me do that.
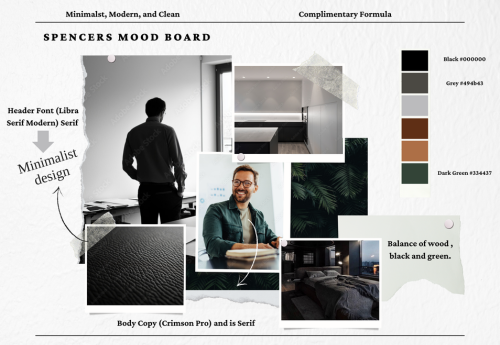
Step 3: Choosing a Theme
With WordPress sorted, the next big step was finding a theme that fit my vibe. I spent way too much time scrolling through themes, trying to pick one that felt clean and modern but still had some personality. I wanted my work to be the main focus, so I eventually landed on a minimalist theme that kept things simple but looked great. Bonus—it was mobile-friendly, which was super important since so many people check stuff out on their phones these days.
Step 4: What do I want to post?
Finding out what to post on my website can be challenging because I didn’t just want to throw up random info about myself; I wanted it to feel authentic and really show who I am.
Step 5: Designing the Layout
This part was a lot of fun. I got to mess around with different layouts and figure out what worked best. My main goal was to make sure the site was easy to navigate but still looked cool. I used WordPress’s drag-and-drop tools to move sections around, test out different arrangements, and make sure everything flowed nicely. It felt good seeing it all come together, and I liked knowing that the site wasn’t just functional—it was something I was proud to share.
Step 6: Implementing Functionality
Once the basics were set, I added a few features to make the site more useful. I included a contact form so people could easily reach me, links to my social media, and even embedded my resume. I also decided to add a blog section where I could write about things like marketing trends or lessons I’ve learned from projects. It made the site feel more dynamic and gave me a way to keep adding to it over time.
Step 7: Testing and Feedback
Before I officially launched the site, I asked my instructor and a few classmates to check it out. Their feedback was super helpful—they pointed out a few things I hadn’t thought of, like how fast the site loaded and whether the navigation made sense. I took their suggestions and made a bunch of tweaks, which really improved the overall feel of the site.
Step 8: Launching the Site
Finally, it was time to launch! Hitting “publish” felt amazing—like, all the work I’d put into it was finally out there for people to see. I shared the link on my social media and made sure everything was easy to find, from my contact info to my projects. Seeing people check it out and hearing their reactions made all the effort totally worth it.
Step 9: Continuous Improvement
Even though my site is live, I know it’s not “done.” I’m planning to keep updating it with new projects and blog posts as I go. It’s kind of cool knowing that my website will grow with me and show my progress over time. Plus, staying on top of updates will help me keep up with new design trends and make sure my site always feels fresh.
Conclusion
Building my first portfolio website was a lot of work. It pushed me to think about what I wanted to say about myself, organize my projects, and figure out some web design basics. If you’re thinking about creating your own site, I’d say go for it! It’s not just about showing off your work—it’s also a great way to learn new skills and grow. If you’re stuck, there are tons of great resources online to help you get started.
A great website that helped me build mine is this one.
You can learn more and contact me here!